งานที่ 2
- รับลิงก์
- X
- อีเมล
- แอปอื่นๆ
สอนใช้งาน NodeMCU ESP8266 เชื่อมต่อ DHT11 เซ็นเซอร์วัดอุณหภูมิและความชื้น แสดงค่าผ่าน wifi web server
2 ปีที่ผ่านมา
โดย เจ้าของร้าน
สอนใช้งาน NodeMCU ESP8266 เชื่อมต่อ DHT11 เซ็นเซอร์วัดอุณหภูมิและความชื้น แสดงค่าผ่าน wifi web server
บทความนี้จะสอนใช้งาน NodeMCU ESP8266 เชื่อมต่อกับ DHT11 เซ็นเซอร์วัดอุณหภูมิและความชื้น แสดงค่าความชื้น และ อุณหภูมิ ผ่าน เว็บ ไม่ว่าเราจะอยู่ที่ไหน ก็สามารถดู ความชื้น และ อุณหภูมิ ผ่านมือถือ หรือ อุปกรณ์ที่ เชื่อมต่อเน็ตได้ทุกที่ทั่วโลก
อุปกรณ์ที่ต้องใช้ ทำ NodeMCU เชื่อมต่อ DHT11 เซ็นเซอร์วัดอุณหภูมิและความชื้น แสดงค่าผ่าน wifi web server
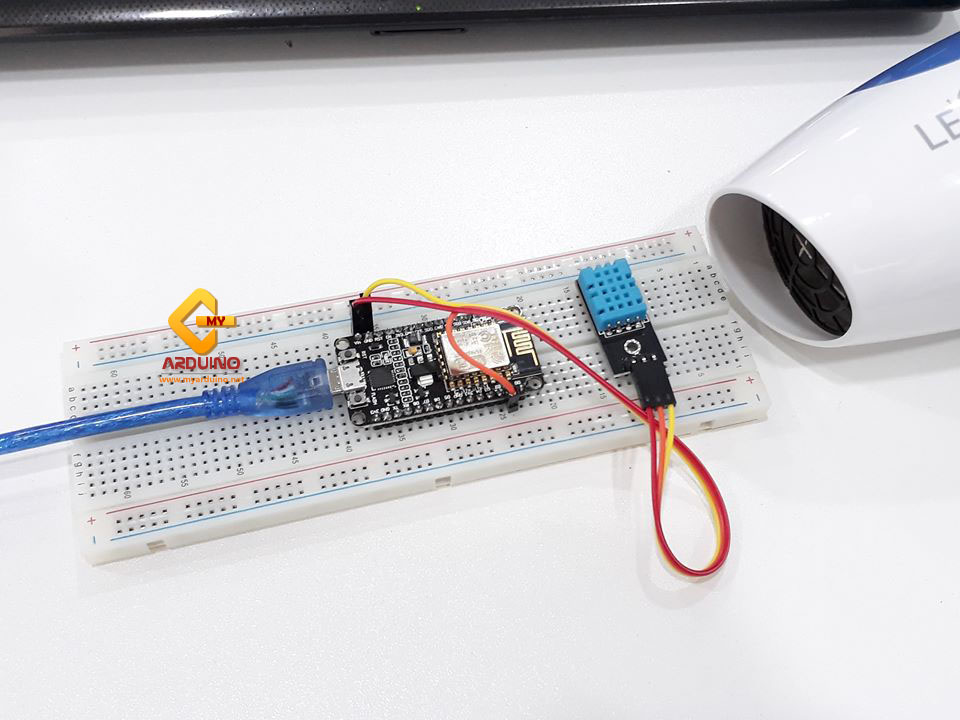
วิธีการต่ออุปกรณ์ สอนใช้งาน NodeMCU ESP8266 เชื่อมต่อ DHT11 เซ็นเซอร์วัดอุณหภูมิและความชื้น แสดงค่าผ่าน wifi web server
NodeMCU ESP8266 -> DHT11
Vin -> ขา +
GND -> ขา -
D1 -> ขา out

ให้โหลด Library ลง โปรแกรม arduino ก่อน เสร็จแล้วให้ อัพโหลดโค๊ดข้างล่างลง NodeMCU ESP8266
ให้แก้ไขสองบรรทัดนี้เป็น ชื่อ และ รหัส wifi ของเรา
เมื่อ อัพโหลดโค๊ดสำเร็จ โปรแกรมจะขึ้นตามรูปด้านล่าง

ให้เราเปิด serial monitor ขึ้นมาจะเจอ address ที่เราเตอร์แจกให้ NodeMCU ESP8266 ตามรูปด้านล่าง แปลว่า NodeMCU ESP8266 เชื่อมต่อกับเราเตอร์สำเร็จแล้ว

ให้เรานำ Addressที่เราเตอร์แจกให้ NodeMCU ESP8266 ไปเปิดใน เบราเซอร์ จะขึ้นหน้าเว็บ ตามรูปด้านล่าง หน้าเว็บ จะแสดงค่า อุณหภูมิ และความชื่นที่ DHT11 ส่งมา ผ่าน wifi ในสภาพอากาศปัจจุบัน

ถ้าเราเอาไดร์เป่าผม มาเป่าที่ sersor DHT11 ค่าอุณหภูมิและความชื้นก็จะเปลี่ยนไป ให้รีเฟรชหน้าเว็บแล้วจะขึ้นค่าอุณหภูมิและความชื้นปัจจัุบัน

บทความนี้จะสอนใช้งาน NodeMCU ESP8266 เชื่อมต่อกับ DHT11 เซ็นเซอร์วัดอุณหภูมิและความชื้น แสดงค่าความชื้น และ อุณหภูมิ ผ่าน เว็บ ไม่ว่าเราจะอยู่ที่ไหน ก็สามารถดู ความชื้น และ อุณหภูมิ ผ่านมือถือ หรือ อุปกรณ์ที่ เชื่อมต่อเน็ตได้ทุกที่ทั่วโลก
อุปกรณ์ที่ต้องใช้ ทำ NodeMCU เชื่อมต่อ DHT11 เซ็นเซอร์วัดอุณหภูมิและความชื้น แสดงค่าผ่าน wifi web server
วิธีการต่ออุปกรณ์ สอนใช้งาน NodeMCU ESP8266 เชื่อมต่อ DHT11 เซ็นเซอร์วัดอุณหภูมิและความชื้น แสดงค่าผ่าน wifi web server
NodeMCU ESP8266 -> DHT11
Vin -> ขา +
GND -> ขา -
D1 -> ขา out
library /code DHT11
- http://www.mediafire.com/file/b1qj4x49sq94569/DHT-sensor-library-master.zip/file
- http://www.mediafire.com/file/1xqqnpk4g42wdug/Adafruit_Sensor-master.zip/file
ให้โหลด Library ลง โปรแกรม arduino ก่อน เสร็จแล้วให้ อัพโหลดโค๊ดข้างล่างลง NodeMCU ESP8266
ให้แก้ไขสองบรรทัดนี้เป็น ชื่อ และ รหัส wifi ของเรา
const char* ssid = "my_arduino"; //ชื่อ wifi ของเรา
const char* password = "0927566556"; //รหัส wifi ของเรา
const char* password = "0927566556"; //รหัส wifi ของเรา
| /********* | |
| Rui Santos | |
| Complete project details at http://randomnerdtutorials.com | |
| *********/ | |
| // Including the ESP8266 WiFi library | |
| #include <ESP8266WiFi.h> | |
| #include "DHT.h" | |
| // Uncomment one of the lines below for whatever DHT sensor type you're using! | |
| #define DHTTYPE DHT11 // DHT 11 | |
| //#define DHTTYPE DHT21 // DHT 21 (AM2301) | |
| //#define DHTTYPE DHT22 // DHT 22 (AM2302), AM2321 | |
| // Replace with your network details | |
| const char* ssid = "my_arduino"; | |
| const char* password = "0927566556"; | |
| // Web Server on port 80 | |
| WiFiServer server(80); | |
| // DHT Sensor | |
| const int DHTPin = 5; | |
| // Initialize DHT sensor. | |
| DHT dht(DHTPin, DHTTYPE); | |
| // Temporary variables | |
| static char celsiusTemp[7]; | |
| static char fahrenheitTemp[7]; | |
| static char humidityTemp[7]; | |
| // only runs once on boot | |
| void setup() { | |
| // Initializing serial port for debugging purposes | |
| Serial.begin(115200); | |
| delay(10); | |
| dht.begin(); | |
| // Connecting to WiFi network | |
| Serial.println(); | |
| Serial.print("Connecting to "); | |
| Serial.println(ssid); | |
| WiFi.begin(ssid, password); | |
| while (WiFi.status() != WL_CONNECTED) { | |
| delay(500); | |
| Serial.print("."); | |
| } | |
| Serial.println(""); | |
| Serial.println("WiFi connected"); | |
| // Starting the web server | |
| server.begin(); | |
| Serial.println("Web server running. Waiting for the ESP IP..."); | |
| delay(10000); | |
| // Printing the ESP IP address | |
| Serial.println(WiFi.localIP()); | |
| } | |
| // runs over and over again | |
| void loop() { | |
| // Listenning for new clients | |
| WiFiClient client = server.available(); | |
| if (client) { | |
| Serial.println("New client"); | |
| // bolean to locate when the http request ends | |
| boolean blank_line = true; | |
| while (client.connected()) { | |
| if (client.available()) { | |
| char c = client.read(); | |
| if (c == '\n' && blank_line) { | |
| // Sensor readings may also be up to 2 seconds 'old' (its a very slow sensor) | |
| float h = dht.readHumidity(); | |
| // Read temperature as Celsius (the default) | |
| float t = dht.readTemperature(); | |
| // Read temperature as Fahrenheit (isFahrenheit = true) | |
| float f = dht.readTemperature(true); | |
| // Check if any reads failed and exit early (to try again). | |
| if (isnan(h) || isnan(t) || isnan(f)) { | |
| Serial.println("Failed to read from DHT sensor!"); | |
| strcpy(celsiusTemp, "Failed"); | |
| strcpy(fahrenheitTemp, "Failed"); | |
| strcpy(humidityTemp, "Failed"); | |
| } | |
| else { | |
| // Computes temperature values in Celsius + Fahrenheit and Humidity | |
| float hic = dht.computeHeatIndex(t, h, false); | |
| dtostrf(hic, 6, 2, celsiusTemp); | |
| float hif = dht.computeHeatIndex(f, h); | |
| dtostrf(hif, 6, 2, fahrenheitTemp); | |
| dtostrf(h, 6, 2, humidityTemp); | |
| // You can delete the following Serial.print's, it's just for debugging purposes | |
| Serial.print("Humidity: "); | |
| Serial.print(h); | |
| Serial.print(" %\t Temperature: "); | |
| Serial.print(t); | |
| Serial.print(" *C "); | |
| Serial.print(f); | |
| Serial.print(" *F\t Heat index: "); | |
| Serial.print(hic); | |
| Serial.print(" *C "); | |
| Serial.print(hif); | |
| Serial.print(" *F"); | |
| Serial.print("Humidity: "); | |
| Serial.print(h); | |
| Serial.print(" %\t Temperature: "); | |
| Serial.print(t); | |
| Serial.print(" *C "); | |
| Serial.print(f); | |
| Serial.print(" *F\t Heat index: "); | |
| Serial.print(hic); | |
| Serial.print(" *C "); | |
| Serial.print(hif); | |
| Serial.println(" *F"); | |
| } | |
| client.println("HTTP/1.1 200 OK"); | |
| client.println("Content-Type: text/html"); | |
| client.println("Connection: close"); | |
| client.println(); | |
| // your actual web page that displays temperature and humidity | |
| client.println("<!DOCTYPE HTML>"); | |
| client.println("<html>"); | |
| client.println("<head></head><body><h1>ESP8266 - Temperature and Humidity Myarduino.net</h1><h3>Temperature in Celsius: "); | |
| client.println(celsiusTemp); | |
| client.println("*C</h3><h3>Temperature in Fahrenheit: "); | |
| client.println(fahrenheitTemp); | |
| client.println("*F</h3><h3>Humidity: "); | |
| client.println(humidityTemp); | |
| client.println("%</h3><h3>"); | |
| client.println("</body></html>"); | |
| break; | |
| } | |
| if (c == '\n') { | |
| // when starts reading a new line | |
| blank_line = true; | |
| } | |
| else if (c != '\r') { | |
| // when finds a character on the current line | |
| blank_line = false; | |
| } | |
| } | |
| } | |
| // closing the client connection | |
| delay(1); | |
| client.stop(); | |
| Serial.println("Client disconnected."); | |
| } | |
| } |
เมื่อ อัพโหลดโค๊ดสำเร็จ โปรแกรมจะขึ้นตามรูปด้านล่าง
ให้เราเปิด serial monitor ขึ้นมาจะเจอ address ที่เราเตอร์แจกให้ NodeMCU ESP8266 ตามรูปด้านล่าง แปลว่า NodeMCU ESP8266 เชื่อมต่อกับเราเตอร์สำเร็จแล้ว
ให้เรานำ Addressที่เราเตอร์แจกให้ NodeMCU ESP8266 ไปเปิดใน เบราเซอร์ จะขึ้นหน้าเว็บ ตามรูปด้านล่าง หน้าเว็บ จะแสดงค่า อุณหภูมิ และความชื่นที่ DHT11 ส่งมา ผ่าน wifi ในสภาพอากาศปัจจุบัน
ถ้าเราเอาไดร์เป่าผม มาเป่าที่ sersor DHT11 ค่าอุณหภูมิและความชื้นก็จะเปลี่ยนไป ให้รีเฟรชหน้าเว็บแล้วจะขึ้นค่าอุณหภูมิและความชื้นปัจจัุบัน
- รับลิงก์
- X
- อีเมล
- แอปอื่นๆ

ความคิดเห็น
แสดงความคิดเห็น